Hi! I am trying to replace the thermostat- The old thermostat had a tab which connected to one connector of the element the other end was connected to the wiring harness. The new instructions say that I will use a jumper with a male/female connector to connect one end to the wiring harness and also to one connector of the heating element. But that leaves the other end disconnected??? I am so confused. Is there anywhere I can find a picture of it correctly installed? The diagram on the instruction sheet is really little to no help. Thanks so much!
when i unhooked the other wires from the harness. looking at the back of it, from left it had a red wire, a orange wire and another red wire
ok the first red wire went to the thermostat, the second wire was orange and it also went to the thermostat, the third wire red was attached to the element itself on the top . so using a jump wire i was figuring that the first wire would go like normal…it was red to the thermostat.
the orange wire i thought needed to be crimped and placed on the thermostat with the jumpwire and cut placed together… the other end of the jumpwire went to where the third red wire was and was to be put together, am i wrong? I dont know how to do that or what the other pieces to the package belong to there is a silver bracket and a gold bracket if you look at the picture. this is my delima as well i said this is all new to me and i dont know what the male/female things are is this what they are talking about in the silver and gold?
— Begin quote from abadfish66;29733
The male/female part you are looking for should be the brass one that has a female end to hook to the thermostat, and the male end to hook the wire to it, so basically you should have 2 wires coming off one terminal of the thermostat and one wire coming off the other end of the thermostat for a total of 3 wires. Does this make sense?
— End quote
no sorry, can you pls explain the red and orange wires that come from the wiring harness?
the first thermostat has three prongs… the first one had the red wire on it the second on had the orange wire on it and the third wire went to the heating element
ok on the second new thermostat it only had two prongs i know the first one will have the first red wire on it… what do i put on the second one the orange and jumper wire crimped together? and the other part of the jumper wire to be crimped together with the other red wire… i know now the male and female components the brass is the female and the silver is the male?
— Begin quote from abadfish66;29739
First look at the brass connector it has a male and female side on it. It is also called a piggyback terminal, do you see that?
— End quote
Yes, i see it.
— Begin quote from abadfish66;29742
Cut off one end of the jumper wire, and crimp on the brass male/female terminal. now attach one end of the jumper to the heater and the other end to the thermostat. Now the wire that came from the wire harness, cut off the end and crimp on the silver teminal and attach that to the male/female terminal you just attached to the thermostat. now the left over wire will connect to the other side of the thermostat.
— End quote
you mean the left over wire from the jumper right?
the one i am placeing in the silver terminal it already has a prong on it will it not fit without any cutting?
this makes sense now
here is a picture i found of the whole thing
http://www.appliancepartspros.com/part_details.aspx?part_id=3094244&pn_=279816
— Begin quote from macoca2005;29744
you mean the left over wire from the jumper right?
the one i am placeing in the silver terminal it already has a prong on it will it not fit without any cutting?
this makes sense now
here is a picture i found of the whole thing
never mind just tried it and it will not work i will have to cut it and do it right
— End quote
I don’t know if that terminal will fit, if it does great, if not you have to cut and crimp on the silver terminal. What color wire came from the wire harness, red or orange?
the orange wire…
ok i believe i have it now wished i could post a picuture of it when i got done for everyone else to see
on the old terminal fuse it had three connections one that comes from wiring harness which is red… that is the first one, it stays the same so i am hooking it back up in the same spot on the new one
the second wire went to a orange wire on the wiring harness
ok this is where i cut and put it on the silver prong which is the female i then take the jumper wire and cut one end of it and put it on the male prong which is brass… then i take the brass one and the silver one and attach them together… the other jumper wire goes on the top of the heating element
the other red wire stays the same as well it goes on the bottom of the heating element
the jumper wire is making connections where it had three connections on the first fuse down to two connections but by using the male and female connectors which is the male brass and the female silver, by putting them together it makes the same thing that was on the first one…
I hope i am saying this right cause this is what i am fixing to do
thanks for your help
if i am doing it wrong please contact me again lol
Sounds ok, when you get done, you will have red jumper and orange wire on one side of the thermostat and the other red wire on the other side of the thermostat.
I don’t understand why no one can give a visual guide for this. So after reading lots of explanations on how it’s to be done, I did it, and took pictures. If anyone sees anything wrong with what I did, please let me know.
First off, I set out to replace all three thermostats in the back of my Whirlpool dryer. There is one on the Fan assembly, one near the bottom of the heating tube, and one near the top.
When I got the parts from searspartsdirect.com, I gave them the parts off of the parts list for my exact model. The lady didn’t tell me that the replacement for one of them would include another one, and that it would look different.
3387134 is the Fan Thermo… replaced no problem.
3399693 is the lower Thermostat
3977393 is the upper Thermal Cut off
What I got was a different part for the lower thermo (3977767, which is a smaller thermo) and a replacement kit part 279816 for the upper.
It contains what we all know and love, the upper TCO, and a wierd 3390291 for the lower that doesn’t have the same J hook connector to the Heating Element.
After talking to a local appliance repair guy, he said it would be best to go with the kit, and do not use the 3977767 part as the 279816 is a newer release, and is paried with the upper TCO.
so… I’ve collected pictures of the whole process as I did it. I hope this helps anyone else doing it, or more importantly, if someone sees something I did wrong, let me know. ![]()
These are thumbnails to the images on my image hoster. You can browse the album directly if you want to. Hope the image quality is decent enough to see. Comments above the pic.
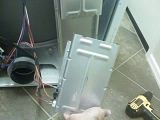
Pic of back of dryer. Fan assembly on left, Heating element on right.
[ ](http://i149.photobucket.com/albums/s70/ubersky/Dryer/img030.jpg"]
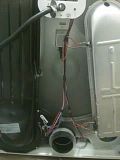 [/URL]
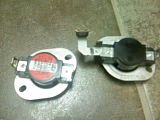
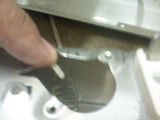
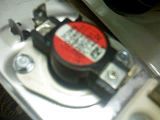
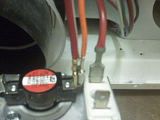
Close up of the Thermal Cut off
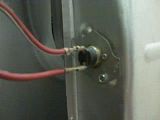
Close up of the Thermostat
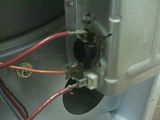
Removing the Heating Element housing
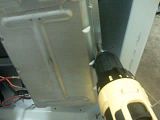
And it’s off!
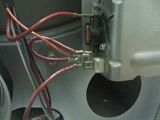
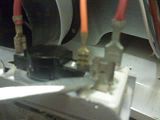
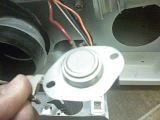
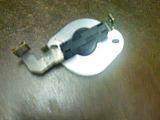
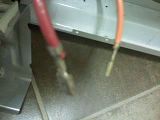
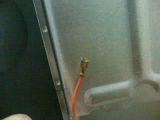
Close up of the Thermo. Notice the Red and Orange wires from the Dryer on the left, and the connector to the Element.

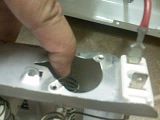
Prying off the connector
Removing wires
Inspection of the bad thermo
Removing the Thermal Cut Off
Inspection of the bad TCO

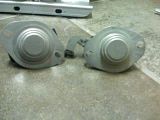
Comparing old and new, just in case
Replaced TCO… This is definitely the easy part.
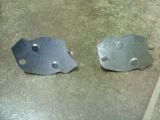
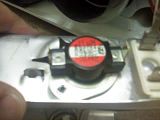
Ok, This is the replacement part for the LOWER Thermostat that came by itself. This is part number 3977767. This is not to be used. See how it has the J connector on it? You’d think this would be the right part, but noooo.
Notice the 3977767 has a smaller bulb.
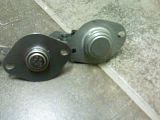
Comparison of the correct part that came in the 279816 kit, part 3390291. See it’s missing the J connector.
But it has the correct sized bulb.
Instructions state to bend down the tab that the old one was held in by
A little tough, but you don’t need to bend it that far.
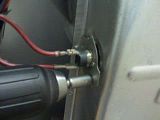
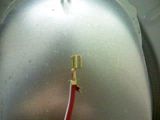
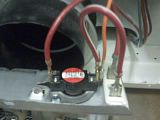
Place the new Thermo in place
And fasten with supplied screws.
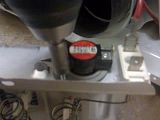
Pretty neat huh?
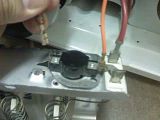
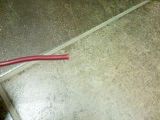
Ok, now inspect the wires. These are the red and orange ones removed from the thermo
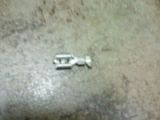
This is what came with the kit. One jumper wire, two connectors, one brass, one grey.
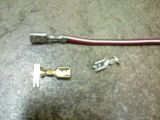
Notice something important. The jumper wire has different sized connectors. You want to leave the larger one as it will connect to the heating element where the J connector used to. Cut off the smaller one.
Snip… no going back now.
eeeek.
Strip it.
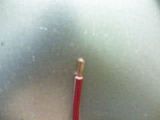
And place the brass funny looking connector on it. Crimping it seems to be a pain in the butt, as the wires don’t seem to want to be contained by the little small prongs. The larger prongs on end are to grip the insulation. Make sure it’s all nice and neat.
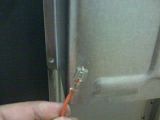
Ok, next cut off the connector from the orange wire connected to the Dryer. Again… slight panic moment.
Strip it, put the grey connector on it, and crimp it in place. Easier, but make sure the crimp is tight so the wire doesn’t pull out.
All done.
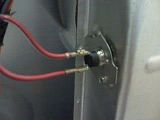
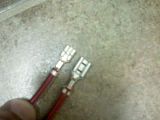
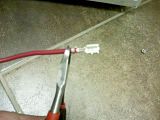
Ok, now shove the new orange with grey connector onto the extra flappy looking thing on the brass connector. They should look like they are having…well… inappropriate contact.
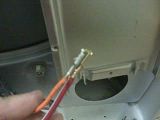
then push the little lovebirds onto the thermostat.
Then push the other end of the red jumper wire onto the Heating Element.
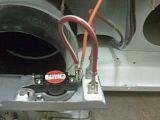
Then connect the remaining red wire from the Dryer onto the Thermo.
Replace the Heating Element housing, and secure.
[URL="http://i149.photobucket.com/albums/s70/ubersky/Dryer/img067.jpg)
At this point I’d re-plug the dryer in and test it. Everything looked ok to me, but we are going to run a few loads to see, and hope it doesn’t burn the house down. ![]()
Please let me know if you have any comments. I hope this doesn’t make the post too huge to be useful.
Mike
First of all, let me say, as a woman, I am quite handy, I like to take things a part and fix them and put them back together, but this one threw me for a loop. Why can’t they just make the same part to replace the same part?? You pictures and descriptions were very much…VERY MUCH appreciated. I would have probably given up and bought a new dryer without them. Thanks!
I purchased the replacement parts and could not figure out how to make them work…The intructs that came with the part left me me asking a lot of questions.Turned to the web, got lucky on the keywords and hit this site. The detail/pictures of the instructions are exactly what a novice like me needs.
Thanks for taking the effort and time to post these.
Many thanks for your wonderful and detailed post.
My issue is that I do not have the orange wire to which everybody refers.
I do have a Sears 80 series dryer which looks exactly like your dryer.
Any assistance would be highly appreciated.
Cheers
I too had the issue of not enough information. These pictures helped me right up until I realized that everyone else had a orange wire, a red wire and a second red wire from the harness(whatever that is). I do not see an orange wire. I was installing the kit per the instructions and yours too but do not have an orange wire so I connected everything else as instructed and it still will not heat. Any ideas?
— Begin quote from ubersky;30422
I don’t understand why no one can give a visual guide for this. So after reading lots of explanations on how it’s to be done, I did it, and took pictures. If anyone sees anything wrong with what I did, please let me know.
First off, I set out to replace all three thermostats in the back of my Whirlpool dryer. There is one on the Fan assembly, one near the bottom of the heating tube, and one near the top.
When I got the parts from searspartsdirect.com, I gave them the parts off of the parts list for my exact model. The lady didn’t tell me that the replacement for one of them would include another one, and that it would look different.
3387134 is the Fan Thermo… replaced no problem.
3399693 is the lower Thermostat
3977393 is the upper Thermal Cut off
What I got was a different part for the lower thermo (3977767, which is a smaller thermo) and a replacement kit part 279816 for the upper.
It contains what we all know and love, the upper TCO, and a wierd 3390291 for the lower that doesn’t have the same J hook connector to the Heating Element.
After talking to a local appliance repair guy, he said it would be best to go with the kit, and do not use the 3977767 part as the 279816 is a newer release, and is paried with the upper TCO.
so… I’ve collected pictures of the whole process as I did it. I hope this helps anyone else doing it, or more importantly, if someone sees something I did wrong, let me know. ![]()
These are thumbnails to the images on my image hoster. You can browse the album directly if you want to. Hope the image quality is decent enough to see. Comments above the pic.
Pic of back of dryer. Fan assembly on left, Heating element on right.
[](http://i149.photobucket.com/albums/s70/ubersky/Dryer/img030.jpg"][/URL]
Close up of the Thermal Cut off
Close up of the Thermostat
Removing the Heating Element housing
And it’s off!
Close up of the Thermo. Notice the Red and Orange wires from the Dryer on the left, and the connector to the Element.
Prying off the connector
Removing wires
Inspection of the bad thermo
Removing the Thermal Cut Off
Inspection of the bad TCO
Comparing old and new, just in case
Replaced TCO… This is definitely the easy part.
Ok, This is the replacement part for the LOWER Thermostat that came by itself. This is part number 3977767. This is not to be used. See how it has the J connector on it? You’d think this would be the right part, but noooo.
Notice the 3977767 has a smaller bulb.
Comparison of the correct part that came in the 279816 kit, part 3390291. See it’s missing the J connector.
But it has the correct sized bulb.
Instructions state to bend down the tab that the old one was held in by
A little tough, but you don’t need to bend it that far.
Place the new Thermo in place
And fasten with supplied screws.
Pretty neat huh?
Ok, now inspect the wires. These are the red and orange ones removed from the thermo
This is what came with the kit. One jumper wire, two connectors, one brass, one grey.
Notice something important. The jumper wire has different sized connectors. You want to leave the larger one as it will connect to the heating element where the J connector used to. Cut off the smaller one.
Snip… no going back now.
eeeek.
Strip it.
And place the brass funny looking connector on it. Crimping it seems to be a pain in the butt, as the wires don’t seem to want to be contained by the little small prongs. The larger prongs on end are to grip the insulation. Make sure it’s all nice and neat.
Ok, next cut off the connector from the orange wire connected to the Dryer. Again… slight panic moment.
Strip it, put the grey connector on it, and crimp it in place. Easier, but make sure the crimp is tight so the wire doesn’t pull out.
All done.
Ok, now shove the new orange with grey connector onto the extra flappy looking thing on the brass connector. They should look like they are having…well… inappropriate contact.
then push the little lovebirds onto the thermostat.
Then push the other end of the red jumper wire onto the Heating Element.
Then connect the remaining red wire from the Dryer onto the Thermo.
Replace the Heating Element housing, and secure.
[URL="http://i149.photobucket.com/albums/s70/ubersky/Dryer/img067.jpg)
At this point I’d re-plug the dryer in and test it. Everything looked ok to me, but we are going to run a few loads to see, and hope it doesn’t burn the house down. ![]()
Please let me know if you have any comments. I hope this doesn’t make the post too huge to be useful.
Mike
— End quote
Mike, the pictures are great but i ave a question. I have removed the thermostat part # 33690291 from my dryer, and when i shake it it rattles. Is this an indication of it being broken? I’m not sure if this particular thermostat is the issue with my dryer or not.
Accodring to this schematic http://www.appliance-parts-warehouse.com/whirlpool-parts/Whirlpool-Dryer-Parts/Whirlpool-Parts-LER8858EQ0/Whirlpool-Parts-73839.cfm
that part is the thermal cut off thermostat [part 9].
Personally i think i need to get to part #8, the cycling thermostat which i believe controls the amount of heat produced.
Note, my dryer works * however, it doesn’t seem to cool down in the cool down cycle at the end of the cycle run. Does that make sense.*
Is the jumper wire even needed if the thermostat removed from the dryer only has two terminals (that is ~ looks like the new thermostat)?
The one in the photos above looks like it attached to the heating element directly and the new style thermostat doesn’t do that; Is that is why the jumper wire is included, to make that connection?
If your old thermostat looks like the new one in the kit, (2-terminals) can you just plug the wires in and close up the back of the washer?![]()
Thanks!
no display on led.(sometimes there will be part of a pixel)washer will work on one setting.it used to read 81 on display.other wise works ok.
Update: It would appear that you do not need to mess with that jumper wire if your old part looks like the new one. We’ve done a dozen loads so far with no ill consequences.
The pictures were great help. I replaced all three thermostats but am still having issues. Now the heating coil comes on when I just turn the timer on, not even pushing start yet. It stays on until I manually turn it off. The original issue with the dryer was that it was overheating, hot to the touch and basically burning the clothes. I cleaned out the lint ducts, checked for blockages, changed the thermostats, checked for a short and can’t figure out what the problem is. Any advice would be greatly appreciated.
— Begin quote from alandlulu;181577
The pictures were great help. I replaced all three thermostats but am still having issues. Now the heating coil comes on when I just turn the timer on, not even pushing start yet. It stays on until I manually turn it off. The original issue with the dryer was that it was overheating, hot to the touch and basically burning the clothes. I cleaned out the lint ducts, checked for blockages, changed the thermostats, checked for a short and can’t figure out what the problem is. Any advice would be greatly appreciated.
— End quote
Not knowing anything else about what’s going on with your dryer, but have you checked the airflow? Later that year we had problems again, and found a bird had built a nest in the Dryer vent exhaust. make sure your airway is clear!